Understanding Bike Geometry
A bike's geometry strongly influences its handling, your comfort, your aerodynamics and your power output. Fit can have far more impact on performance and feel than expensive components.
What is the ideal fit? That depends on your style of riding and your priorities.
Road bike fit and geometry
Differences in road bike geometry are now primarily about choosing (and adapting) a bike to fit your body’s biomechanics, rather than a bike’s handling.
On a road or TT bike, you’re generally trying to achieve a balance between three factors: comfort, power and aerodynamics.
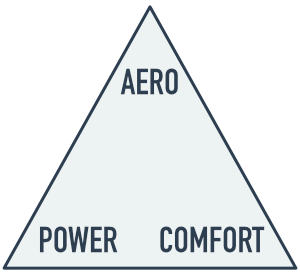
Power, aero, comfort: choose any two.
- Power: optimise saddle height (typically high) and fore/aft position relative to BB
- Aero: lower stack, longer effective top tube (flattening your back and reducing frontal area)
- Comfort or sustainability: higher stack, shorter reach (sitting up)
You’ll find ‘sportive’ road bikes often have a shorter reach and higher stack, keeping your head up to ease neck strain on a long ride. Racier bikes will be longer and lower… more aerodynamic, but tough to maintain that position for a long time.
The parameters affecting road bike handling have settled on a formula that’s known to work for each category and differs little between brands. You’ll find most road race bikes have steeper head angles and shorter wheelbases, making them sharper handling than a more easy-going endurance bike.
Example: Racy TCR vs endurance Defy
Because road bike fit is so dependent on your body’s dimensions and your own flexibility and strength, a professional bike fit is often a good investment. We’re not on commission, but we’re convinced enough of the merits to have built a big list of bike fitters, searchable by location.
Mountain bike fit and geometry
On a mountain bike, unless you’re XC racing and striving for pure efficiency, you’ll probably focus on handling rather than your body’s biomechanics.
Climbing and descending place different demands on geometry, so it can be useful to think in terms of position when seated (going up) vs position when standing (going down!).
Standing - geometry for descending
When standing, reach and stack define your position over the bike, as your only contact points are your hands and your feet. Dropper posts mean your saddle position is no longer a factor when descending. You’re then thinking about handling on the descents; a slacker head tube angle and longer wheelbase gives stability. (Conversely, shorter chainstays can make a bike feel more playful - quicker to turn and easier to manual - at the expense of wheelbase length.) A lower BB lowers the centre of gravity of the heaviest thing on the bike - you - and helps it carve around corners.
Seated - geometry for climbing
When seated, seat tube angle and top tube length define your position fore and aft. When climbing, you want your centre of gravity forward to keep the front wheel weighted. A steeper seat tube angle helps achieve this. The TT length plus stem length defines how stretched out you are - for sustained climbing, most people will prefer a bit more space in the cockpit. To enjoy the climbs on your new LLS enduro rig, compromise may been needed when thinking about head angle (steeper will make it more nimble on a twisty climb) and BB height (higher will help avoid pedal strikes on roots and rocks).
Long, Low and Slack
Driven by the rise of Enduro (and the dropper seatpost), the last 10 years have seen a marked trend towards longer, lower, slacker bikes.
- Longer reach (with shorter stem) and wheelbase - for stability at high speed
- Lower bottom bracket - for carving corners
- Slacker head angles - for steep terrain and going fast
- (and steeper seat angles - to maintain a good climbing position)
Subjective as it may be, it's now widely accepted that a long reach, short stem and wide bars make for more precise steering. However, the difference in stem lengths need to be taken into account when comparing bikes of different age or intended use. A modern enduro bike might be designed around a 40mm stem, an XC bike (or any MTB a few years old) might assume a 70mm stem. That 30mm difference needs to be added to the reach or effective top tube to give a fair comparison of cockpit length.
The long-low-slack trend is not just for enduro-oriented bikes either; the latest crop of XC bikes also feature long reaches and slack head angles (BB height is more affected by suspension travel and wheel size).
There are so many factors that affect MTB handling besides geometry - tyre pressure, suspension setup, weather conditions! - we’d recommend spending several hours with any prospective new buy at a demo day.
Bike geometry termsA guide to the terminology used throughout geometrygeeks.bike
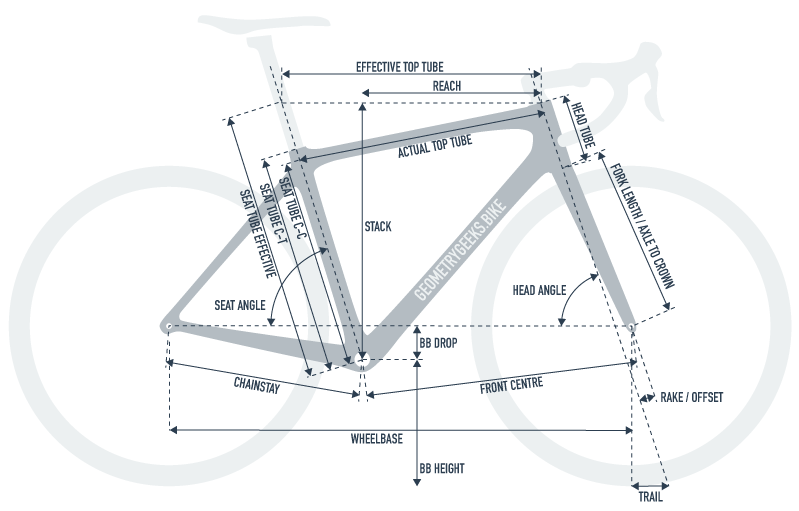
Top Tube Length
aka: Effective Top Tube, Horizontal Top Tube, Virtual Top Tube
Top tube is a good indicator of overall size of the bike.
It's measured 'effectively' horizontally from head tube axis to seat tube axis.
Older bikes frequently had horizontal top tubes, but now sloping tubes are much more common. Where the top tube is horizontal the Effective Top Tube and Actual Top Tube will be identical.
A longer top tube has you more stretched out on the bike, all other things being equal. This will give you a racier, more aerodynamic position on a road bike - possibly at the expense of all-day comfort.
Actual Top Tube Length
Top tube length as measured from head tube axis to seat tube axis, along the tube itself.
This is not particularly useful for bike fit.
Seat Tube Length
"Centre to Top" or C-T is the length from bottom bracket centre to top of seat tube. Useful because you can measure it and helps you work out how much seatpost you need.
"Centre to Centre" or C-C is the length from bottom bracket centre to the middle of where the top tube meets the seat tube. Was a bit more useful when bikes were made without sloping top tubes.
"Effective" is the length from the bottom bracket centre to the point where a horizontal line from the top of the head tube meets the seat tube axis. Less commonly used.
One of these is often used as an overall measure of a bike's size.
Head Angle
aka: Steerer Angle
The angle the forks make with the ground.
A slacker (smaller) head angle gives more stable handling at speed but can feel wander-y while going slower. A steeper (larger) angle makes a bike more precise at slow speeds, but twitchier when going faster.
Seat Angle
aka: Seat Tube Angle, Effective Seat Tube Angle
Seat tube angle. Steeper (larger) places you further forward while seated, slacker (smaller) stretches you out more.
When descending on a mountain bike you'll often be standing, so designers can focus seat angle on climbing performance - this is why MTB seat angles have become much steeper recently.
On mountain bikes where seat tube does not intersect the BB, we use the 'effective' angle.
On time trial bikes, the saddle can often be repositioned to give a wide range of effective seat angles. This is all about optimising sustainable power for the individual.
Actual Seat Tube Angle
On mountain bikes where seat tube does not intersect the BB, the actual angle is sometimes given. Effective angle is usually more useful to consider, unless you run an abnormally high or low saddle.
Stack
The vertical distance from the centre of the bottom bracket to the centre-top of the head tube, where the virtual steering axis passes through.
A low stack feels low, aero and racy. Go too low and your back and neck might start to ache on longer rides, though.
Stack and reach go hand-in-hand to give a useful X-Y position of the front of the bike, before you add a stem (and consider its length, angle and any spacers).
Reach
The horizontal distance from the centre of the bottom bracket to the centre-top of the head tube, where the virtual steering axis passes through.
Very useful for gauging how long a bike feels.
In mountain biking, reach has been lengthening as stems get shorter and bars wider, giving a more stable ride at speed.
Little-known fact: the more spacers you run under your stem, the shorter your 'effective' reach becomes (because of the head tube angle). As a rule of thumb, each 10mm spacer reduces the effective reach by about 3-4mm.
Head Tube
Length of head tube.
A tall head tube may mean you can't fit forks that have had their steerer tube cut, such as those from a smaller bike. Make sure the fork steerer is long enough to allow for headset cups, stem height and head tube length.
A taller head tube raises your hand position, but Stack is often a better measure for this.
Chainstay
aka: Rear Centre
Distance from rear wheel axle to bottom bracket centre.
Shorter chainstays make a mountain bike easier to wheelie/manual and can feel more 'playful', but a tradeoff can be keeping the front wheel planted on a steep climb.
Chainstay length also contributes directly to the total wheelbase, so a shorter chainstay can feel quicker to corner but less stable at speed.
Front Centre
Distance from centre of bottom bracket to the front axle.
Wheelbase
Distance between front and rear axles.
This is the overall length of the bike.
Standover
aka: Standover Clearance, Standover Height
Standover height or clearance is the height from the ground to the top tube. Normally measured at a point halfway along the top tube, but sometimes measured at the lowest point too. Treat with caution!
BB Drop
How far the bottom bracket is below a line drawn between front and rear axles. Sometimes given as a negative number. Almost every bike ever will have a BB below that line.
A bigger drop lowers your centre of gravity, good for cornering but less good for catching your pedals on the ground!
BB Height
How far the bottom bracket is above the ground.
Describes the same thing as BB drop, but varies depending on tyre choice, suspension sag and other factors.
Fork Rake
aka: Fork Offset
How far in front of the steerer tube axis the front axle is.
Along with head angle, the fork offset determines Trail.
Recent trends in MTBs have seen short-offset forks used to allow slacker head angles while keeping trail and wheelbase from becoming too long and unwieldy.
Trail
The distance between the point where the projected steerer tube axis meets the ground and the point where the the wheel contacts the ground.
More trail feels more stable at speed, but can cause more 'flop' of the front wheel when turning more slowly.
A slacker head angle gives more trail.
Seatpost Size (Diameter)
Diameter of seatpost required for the frame. Some frames may require specific shapes of seatpost (e.g. aerodynamic profile) or use a fixed seatmast.
Seatpost Length
Length originally specified as part of the complete bike, or a dropper post.
Handlebar Width
Width originally specified as part of the complete bike.
Road bike bars are usually chosen with the rider's shoulder width in mind. If you're super aero though, you might go narrower to keep your frontal area small.
MTB bars have been growing steadily from under 700mm to over 800mm, giving more leverage and thus stability (but occasionally clipping trees!).
Stem Length
Length originally specified as part of the complete bike.
On a road bike, stem length is one of the easiest ways to adjust your stretched-out-ness.
Typical MTB stems have shrunk from 100-120mm to under 50mm to accommodate wider bars and longer reach.
Crank Length
Length originally specified as part of the complete bike.
Those with longer legs will usually choose longer cranks, but shorter cranks can be useful for 1) making gearing harder for the same cadence and 2) better ground clearance too.
BB Type
aka: Bottom Bracket Type
Bottom bracket standard, e.g. Pressfit BB30 or Threaded 73mm shell.
Axle Spacing
Rear axle spacing standard, e.g. 12x148 Boost or 135x9 QR.
Fork Length
aka: Axle to Crown, A2C
The distance from front axle to top of fork crown. On a suspension fork this is measured with fork uncompressed.
Wheel Size
Diameter of rim used, and tyre width if appropriate. e.g:
- 700c road wheel
- 26"/27.5" (650b)/29" MTB wheels
- 29+ semi fat.